Monday, October 31, 2022

Documentation: Reproduction of Chinese Warring State Beads

Documentation


Reproduction of Chinese Warring State Beads


Baroness Ginevra Lucia Di Namoraza


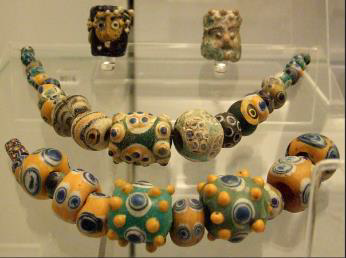
What? A selection of Chinese Warring State glass beads. 

Where? China


When? 200-400 BC. At present, it is accepted that in China, glassmaking began around the 5th century BCE during the late Spring and Autumn to early Warring States periods. Chemical analyses of glass samples dating to this time have identified no less than three glass systems: potash-lime, lead-barium, and potash; of these, lead-barium was the most significant in early China. 


Why? The warring state beads are fascinating as they demonstrate the trade and influence of other civilisations with China. You can see similar beads such as the yellow and blue circular bead found throughout different time periods and cultures. (See picture on the left). The warring state beads differ from their European counterparts in their complexity and their chemical composition.


Details of the extant pieces


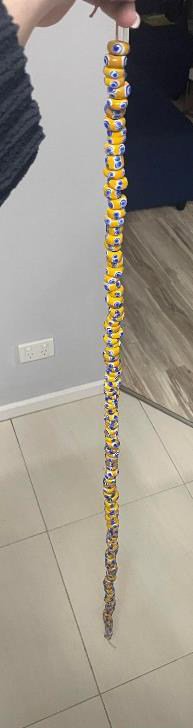
Please refer to the attached appendix which has an easy reference guide to each bead chosen and recreated. These beads were generally not all found at the same time or in the same places. I chose to string mine all together on a metal necklace as I needed to keep the entry small and secure as a friend is very kindly transporting it from Canberra to New Zealand. Most of these beads

are generally displayed as individual items in museums. There was no obvious material remaining to show what the beads were strung on, but organic material such as a leather cord would have been common. (Holgate)


Details of the Recreation


I chose to recreate a number of beads that are on display in a variety of museums to ensure historical accuracy. I worked with each museum's high-resolution images to recreate the beads with their unique characteristics.

These beads are intricate and take forty-five minutes for the simplest, to over an hour and a half for the more complicated beads. The whole project took about 40 hours of work, over a couple of months. The reason for this is that the turquoise colour is very hard to not burn, and the white is also difficult to keep “clean” as it’s in the flame for so long. As such, I had to redo these many times. Added to this, is the fact that the bigger the bead, and the more additional steps and glass, the more likely the bead may crack or shatter. (Which is heart breaking when you spend an hour on one!) I also read through stacks of articles and books and had to learn some Chinese to navigate some of these searches. Glass in this context is called liuli. (Kwan)


The hole of each bead is considerable for most of these beads. As such I used the “3-5mm” sized mandrel which tracks accurately with the sizing and shape of the beads, and the dimension notes mentioned by the museums.


Additionally, there are many centuries of wear on the beads that are on display. This means that colours and details are faded, and many of the beads have faults such as chips etc. The use of a different glass composition is noticed in the wear on the beads from China- the colour is much more faded, and the surface is quite degraded.


I have been working on developing my skill at melting glass and shaping it over the last year. I have learnt a lot, including where in the flame certain glass must be placed so that it doesn’t ruin the colour or texture. I have learnt how to steadily place my hands and rotate both glass and mandrel so that an even amount of glass, at the right temperature, is kept at the right heat to reproduce the desired bead.


The warring state beads presented a variety of challenges. Glass is a dangerous, sometimes fickle substance, and certain colours only work properly at a certain heat. Some of the trickier techniques (and melting glass onto a mandrel and keeping it even is tricky to start with!) that I used for this project include:


  • Studying each (photo of) bead in a variety of lights to get an accurate grasp of the details and finishes required.
  • Working with tricky colours such as yellow, turquoise, and light blue which can be easy to “burn” or mutate colour.
  • Combining colours and the perfect melt down spot to get a more accurate shade and shape.
  • Creating the beads with “eye” decoration in the right size and number. The more complicated beads can have over 170 individual steps in the creation of circles and melting in of shapes.
  • Also ensuring that I copied the “flawed” beads as well, to accurately represent the extant pieces. As a perfectionist- trust me when I say this was possibly my hardest challenge!
  • Shaping similar size beads but also recreating subtle differences such as size and shape.
  • Creating stringers for finer detail in the small dots. One needs to carefully pull glass at a specific pace to achieve this.
  • Certain shapes, such as the double eyes, require precise manoeuvring and shaping- the use of a knife needed to recreate the shape.
  • Using techniques such as flattening the dots between each layer, melting them in completely before adding in the new layer, and then applying the final tiny circle.


Details of the equipment and resources


I did not use the lead barium glass as it’s not commonly used, and the toxicity is not something I wish to be exposed to. I use Effetre Glass which has a working temperature of 945 °C. Effetre is a variety of soda-lime glass.


The earliest-known method of glass manufacturing in China, the alkali (generally potash) and lime glass system, soon gave way to the lead-barium system of glass production that characterised the Warring States period. While archaeologists are not entirely sure why the Chinese first chose to work with this formula, it is believed that the wide availability of both lead and barium and the fact that this composition lowered the melting point of the glass played a role. (As discussed in Early Manufacturing Techniques, the furnaces used in ancient times often struggled to produce enough heat to melt glass.) Produced in the Yangtze River valley region, lead-barium glass soon became very popular within China and was circulated throughout the more accessible areas of that vast country.


Making the glass beads


  • Future Projects:


In the future, I would like to continue practicing these beads as they are so intricate.
I would like to practice more difficult skills, e.g., fine line work and millefiori use.
For this project, I would match the sizes even more accurately as well as the colour and opacity.
I am enjoying creating pieces from different times and cultures and I will continue to develop my skills by choosing challenging projects.
I also enjoyed working with the museum and the professor in a previous project, and I would like to continue working with people like this. Not only was it very educational and rewarding, but it resulted in me contributing to the historical accuracy of the museum- which I thought was cool!
I also intend to work on another historical recreation of a glass making set up.


                                                                                Resources:


Primary Resources:


High-Resolution Copy of the extant beads. Images and links to their original museum location can be found in the appendix.


Secondary Resources:

  • Guido, Margaret. The Glass Beads of Anglo-Saxon England: c. AD 400-700, Boydell Press, 1999. Holgate, Barbara. “The Pagan Lady of Peel”, St. Patrick’s Isle Archaeological Trust, 1987.
  • Liu, R. K. Ancient Chinese glass beads. The Bead Journal 2 (2): 9-19. —1985 Asian Glass Ornaments. 1975 Liu, R.K. Chinese Glass Beads. Export and Minority. Ornament. 2013
  • Kim, Christopher. Early Chinese Lead-Barium Glass; Its Production and Use from the Warring States to Han Periods (475 BCE-220 CE), PDF file. (2012)
  • Kwan, Simon. Early Chinese Faience and Glass Beads and Pendants. 2013, BEADS: Journal of the Society of Bead Researchers
  • Regia Anglorum: https://regia.org/


Image credits

  • Figure 1: Map of the Han Dynast- Bladams 2
  • Figure 2: Yellow and blue beads which have been found everywhere!-CMerritt 2
  • Figure 3: Collection of Chinese Warring State beads-CMerritt 2
  • Figure 4: Collection of Chinese Warring State beads with my hand for scale-CMerritt 2
  • Figure 5: Large dots, with an exact colour recreation, and a plausible ( light green) colour recreation-CMerritt
  • Figure 6: Collection of the beads in a different light- CMerritt 4
  • Figure 7: Examples of using the same colours and tools in a creative but plausible manner- CMerritt      4 Figure 8: A close up of images- CMerritt 6

Websites


Wednesday, September 28, 2022

Documentation-Phoenician Beads

Reproduction: Phoenician Glass Eye Beads, ca 330 BC-70 BC
Baroness Ginevra Lucia Di Namoraza


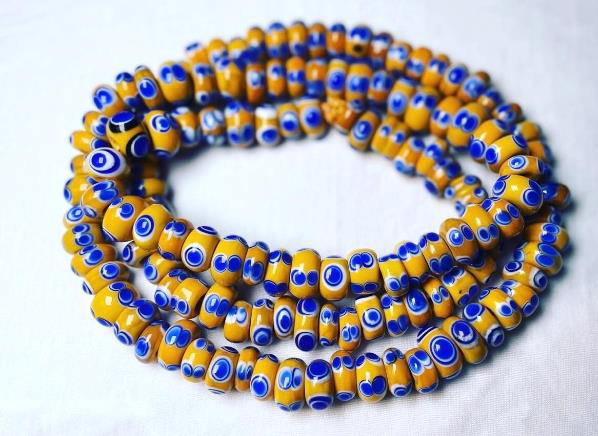
Figure 1- Image of the recreation necklace- C Merritt


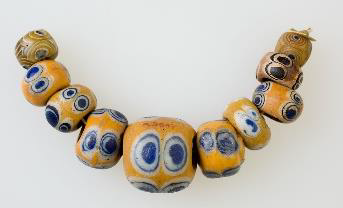
Figure 2- Image of original necklace held by the MET


What? 133 Glass eye beads forming a necklace. I’ve added two extra beads, as the originals were also found with the others, but one was broken and the other one went missing so they couldn’t be displayed.

Where? Phoenician

When? Hellenistic Period

Why? The glass eye beads are fascinating as they demonstrate exactly how beads were traded and how they made their way all over the world. You can also see how the same beads are made in many different time periods and cultures. I will include examples of the exact same bead (in terms of colours, dimensions, and decorations) so that you can see the extent to which they travelled locations and time. When looking at this “necklace” or “collection”, I have noticed several things about it which are fascinating on a scholarly level. Firstly, I believe they were made by several different people, including perhaps an apprentice. Secondly, considering how many there are in very similar forms, I wonder if they were made to sell at a market instead of worn by one person. Thirdly, I have worn the necklace as a double strand necklace, and it is comfortable, though I would say extravagant, and non-practical.

Details of the extant piece:

  • The MET Museum¹ has the following information about the piece:
  • Title: Glass eye beads Period: Hellenistic Date: ca. 330–70 B.C.
  • Culture: Phoenician
  • Medium: Glass
  • Classification: Glass Credit Line: The Cesnola Collection, Purchased by subscription, 1874–76
  • Myres and Christopher Lightfoot have the following additional information:
  • Category: 509: String of eye beads
  • Period: Archaic or Classical,
  • Date: 6th–4th century B.C
  • Culture: Phoenician.
  • Size: Diameter of individual beads⅜–½ in. (1–1.3 cm

Figure 3- Image of a Phoenician woman wearing a similar necklace


Figure 4- Example of similar beads


Description

Opaque yellow, with translucent blue and opaque white stratified eyes. String of 133 eye beads of various shapes, sizes, and designs, many comprising two beads fused together, and all having a large thread-hole. The stratified eye decoration is composed of a blob of opaque white with an overlay of a thin blue circle surrounding a large blue spot. All but one of the beads are intact, the exception having a chip to one side of the thread-hole; slight dulling, with deep pitting on a few of the central blue spots. The beads formed a necklace that probably had an apotropaic as well as a decorative purpose. Strings of similar beads are known from sites throughout the ancient world; for example, there are ten beads in the Department of Egyptian Art that were formerly in the collection of the Reverend Chauncey Murch, who was active as a missionary in Egypt between 1883 and 1906. Stated in the departmental records as comprising 135 beads².

String: There was no obvious material remaining to show what the beads were strung on, but organic material such as a leather or cotton cord would have been common.³


Figure 5- Example of similar beads


Details of the Recreation

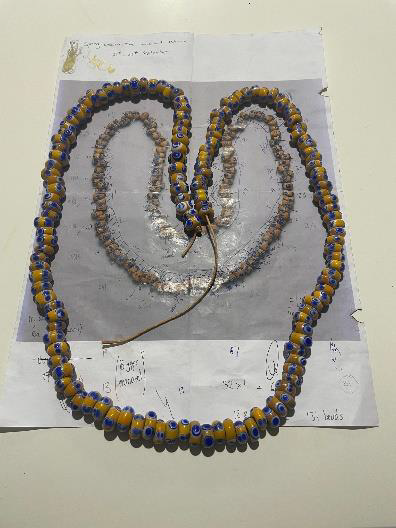
I chose to recreate the 133 beads that are on display for historical accuracy. I worked with the MET museum's high- resolution image to recreate each bead with its unique characteristics. Each bead took me about 20 minutes of time to recreate, making the whole project about 60 hours of work, over 3 months.

As mentioned in Myers⁴, the diameter of the individual beads is 1-1.3 cm, and the hole of each bead is considerable. As such I used the 3.2 mm and 5mm sized mandrel which both track accurately with the sizing and shape of the beads.

I followed up with Christopher Lightfoot, the author of The Cesnola Collection of Cypriot Art: Ancient Glass, to double check the accuracy of the recreation. The measurements on the Met Museum website for the string did not make sense, and when I recreated the piece based on the sizing of the beads as well as the visual cues in photos of the extant beads, the measurement still did not work. I contacted Chris who worked at the museum as a Curator for thirty years. The museum pulled the piece out to check it and then updated the description so that it is now correct, based on my feedback. ( How cool!) 

A point to note is that there is thousand-year-old wear on the beads that are on display. This means that whilst the bead may now appear quite square, they would have been rounder when freshly made. Colours and details are faded, and many of the beads have wear such as chips and odd rubbing marks etc. Interestingly, many of the beads appear to have frequent wear near the eye, which makes it seem as they were rubbed often there- this would make sense if the wearer believed that rubbing the eye would protect them from evil spirits

I have been working on developing my skill at melting glass and shaping it over the last year. I have learnt a lot, including where in the flame certain glass must be placed so that it doesn’t ruin the colour or texture. I have learnt how to steadily place my hands and rotate both glass and mandrel so that an even amount of glass, at the right temperature, is kept at the right heat to reproduce the desired bead.

The necklace presented a variety of challenges. Glass is a dangerous, sometimes fickle substance, and certain colours only work properly at a certain heat.

Some of the trickier techniques (and melting glass onto a mandrel and keeping it even is tricky to start with!) that I used for this project include:

  • Studying each (photo of) bead in a variety of lights to get an accurate grasp of the details and finishes required.
  • Working with tricky colours such as yellow, which can be easy to “burn” or mutate colour.
  • Combining colours and the perfect melt down spot to get a more accurate shade and shape.
  • Creating the beads with “eye” decoration in the right size and a number of blue and white circles.
  • Ensuring that I copied the “flawed” beads as well, to accurately represent the extant pieces. As a perfectionist- trust me when I say this was possibly my hardest challenge!
  • Shaping similar size beads but also recreating subtle differences such as size and shape.
  • Creating stringers for finer detail in the small dots. One needs to carefully pull glass at a specific pace to achieve this.
  • Certain shapes, such as the double eyes, require precise manoeuvring and shaping- the use of a knife needed to recreate the shape.
  • Using techniques such as flattening the dots between each layer, melting them in completely before adding in the new layer, and then applying the final tiny circle.


Figure 6 -10 beads from the Egyptian Department

Something creatively unique

I included several beads that were created using the same materials available in the creation of  the original necklace. I have arranged the colours in different ways and melted the dots in at different levels. As you can see, the result is quite different to the original, and I must say the original colour scheme is quite striking comparatively.


Figure 7
- A photo of the original beads


Figure 8- A photo of the reproduction beads


Making the glass beads


  • I used a graphite paddle, mandrels, bead release, a knife, fire annealing and gravity. I try to use the least tools possible and authentic equipment that would have been used by the glassmakers of the time. Apart from my fire set-up, all the equipment I have used would have been used at the time as well.
  • Clear broken glass was often used as well as imported blocks of coloured glass⁵.
  • The glass rods I used to recreate these beads were Effetre Murano – 104 COE soft glass rods. 
  • This is a close replica of the glass that would have been used at the time.
  • Bead artisans would have created a small kiln or furnace. The broken recycled glass would be put into the furnace through holes in the side to melt in a dish inside the furnace. Air was pumped into the furnace to keep the charcoal hot.⁶
  • I use a hot head torch and MAPP gas. In the future I have plans to recreate a small portable kiln but melting glass in a small kiln is very difficult as getting the heat hot enough to melt the glass is a struggle.
  • Metal rods (mandrels) were dipped with a clay mixture called bead release. The molten glass is wound onto the rod until the desired shape was achieved. Once the bead size and shape were achieved, a design could be added by heating thin bits of glass and wrapping them around the bead, with a “stringer” that was heated and laid on top.⁷
  • I use mandrels that would have been very similar to those used, however, mine are shorter as they don’t need to be as long to reach into a hot fire. The bead release I use has the crucial ingredients of water, kaolin and alumina hydrate, which is a composition that would have been used.
  • Beads would then be moved to an annealing dish in the furnace. This would prevent thermal shock, lowering the chances of the bead cracking.
  • Instead of annealing them in a furnace, I use a product called vermiculite to allow the beads to cool down slowly. I also use a kiln. In the future, I would like to try annealing them in a furnace to see what it is like.
  • After the beads are finished, I remove them from the mandrels, clean them out with some bead cleaning tools and give them a quick clean with some soapy water.
  • I included a selection of creative beads using the resources that would have been available to make this necklace. As you can see, the original colour layout is more striking in colour.


Figure 9
- After a long session and fresh off the mandrel


Figure 10 - The beads I made and my trusty printed photo of the original beads


Future Projects


  • In the future, I would like to practice more difficult skills, e.g., fine line work and millefiori use.
  • For this project, I would match the sizes even more accurately as well as the colour and opacity.
  • I am enjoying creating pieces from different times and cultures and I will continue to develop my skills by choosing challenging projects.
  • I also enjoyed working with the museum and the professor, and I would like to continue working with people like this. Not only was it very educational and rewarding, but it resulted in me contributing to the historical accuracy of the museum- which I thought was super cool!
  • I also intend to work on another historical recreation of a glass making set up.


Figure 11- Worn as a double strand- glass is weighty but feels nice.


Figure 12- The strand is quite long!


Resources

Primary Resources:

High-Resolution Copy of the extant necklace: https://www.metmuseum.org/art/collection/search/239901


Secondary Resources:

  • Guido, Margaret. The Glass Beads of Anglo-Saxon England: c. AD 400-700, Boydell Press, 1999.
  • Holgate, Barbara. “The Pagan Lady of Peel”, St. Patrick’s Isle Archaeological Trust, 1987.
  • Holst, Sanford and Khoury Harb. Phoenicians” Lebanon’s Epic Heritage, 2021.
  • Karageorghis, Vassos, Joan Mertens, and Marice E. Rose. Ancient Art from Cyprus: The Cesnola Collection, 2000.
  • Lightfoot, Christopher S. "Metropolitan Müzesi, Cesnola Koleksiyonu’nda Yeralan Kıbrıs Cam Eserleri." 2013.
  • Lightfoot, Christopher S. The Cesnola Collection of Cypriot Art: Ancient Glass, 2017. Myres, John 
  • L. Handbook of the Cesnola Collection of Antiquities from Cyprus, 1914. Regia Anglorum: 
  • https://regia.org/

Image credits

Figure 1 Image of original necklace held by the MET                                               Met Museum 

Figure 2 Image of the recreation necklace- C Merritt                                                 Carina Merritt 

Figure 3 Image of a Phoenician woman wearing a similar necklace                            Sanford Holst 

Figure 4 Example of similar beads                                                 https://archaicwonder.tumblr.com/ 

Figure 5 Example of similar beads                                                   flickr.com/photos/kotomi-jewelry/ 

Figure 6 10 beads from the Egyptian Department                                                        Met Museum 

Figure 7 A photo of the original beads                                                                  Christopher Lightfoot 

Figure 8 A photo of the reproduction beads                                                                     Carina Merritt 

Figure 9 After a long session and fresh off the mandrel                                                  Carina Merritt 

Figure 10  The beads I made and my trusty printed photo of the original beads              Carina Merritt 

Figure 11 Worn as a double strand- glass is weighty but feels nice.                                  Carina Merritt 

Figure 12 The strand is quite long!                                                                                   Carina Merritt


Tuesday, May 31, 2022

Class Info: Glass Bead Making Class- 2- Intermediate Glass

Lampwork Beads- If you have already participated in a glass bead making class and want to spend some time practising intermediate techniques, have specific questions or wish to create some beads for fun.  

Students should come away with several beads and more specific information on glass beads through time.

Classes will require participants to wear enclosed shoes, tied back hair, fire-safe clothing, gloves and safety glasses. If participants have any of these, feel free to bring your own along, including a dust mask for handling bead release and didymium glasses to protect your eyes from sodium flare.

1-hour class.

Maximum 5 people at a time.

Material Cost: $10 per person


Class Info: Glass Bead Making Class- 1- Introduction to Glass

Lampwork Beads- an introduction in how to make some simple glass beads.

Students should come away with several beads and general information on glass beads through time.

Classes will require participants to wear enclosed shoes, tied back hair, fire-safe clothing, gloves and safety glasses. If participants have any of these, feel free to bring your own along, including a dust mask for handling bead release and didymium glasses to protect your eyes from sodium flare.

1-hour class.

Maximum 5 people at a time.

Material Cost: $10 per person


Glass Bead Making- Class at Polit University

  The class went well with participants from Canberra, Sydney and Melbourne.


What worked well:

-Students successfully made beads and were introduced to the concept of glass bead making and acquired the inspiration to explore having their own setups. 

-Information was delivered in a basic, but informative manner.

-Individual pots to hold mandrels were acquired so that we easily kept track of whose beads are whose.

-Workhorses to hold up the torch etc were purchased and worked well.

- Class notes were typed up and included links for beads and this blog for further information.

Improvements to my teaching set-up:

- Safety standards need to be improved. Although I had all of the safety equipment on hand, I was a bit complacent about my footgear and general safety issues such as hair back etc from working in the comfort of my garage. 

-I need hose fittings to allow 2-3 students to work on beads at the same time. 

- I had bought a gazebo but next class I will make sure it gets set up, including two walls to help circumvent the wind etc.